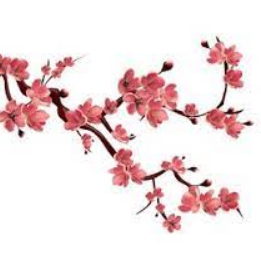
Draw a Japanese flower in just six straightforward steps! There are so many different types of flowers in the world that you are spoiled for choice when trying to choose your favorite type of flower. Certain flowers are closely associated with certain countries or regions and become symbolic of any place they are associated with. For example, you might think of tulips when you think of the Netherlands, and similarly, you’ll probably associate cherry blossoms with Japan. Drawing of a flower
Although this flower is well known for its beauty, it is not always easy to know how to remove a Japanese bud. It can be much more relaxed when you know what to perform, which is what this tutorial is for! Our step-by-step manual on removing a Japanese flower will show you how to do it so you can focus on the fun of drawing rather than the frustration.
How To Draw A Japanese Flower – Allow’s Reach Initiated!
Step 1
To create this focus on how to remove a Japanese bloom, we will start with the first flower attached to the branch on which the next ones will be. To draw this flower, we will draw five petals, each of which will have a rounded square. The bud will have a miniature hoop with pipes in the middle of the bud. Each of these streaks will have an even shorter ring at the end. Now that you’ve drawn this part of the flower, next, we’ll draw thin, angled shapes for the branch it’s attached to. Next, draw curved leaves at the base, then it’s time for step 2!
Step 2: Now, draw more flowers.
This Japanese blossom configuration will count more blooms to the unit. The first of these flowers will go to the left and be drawn almost identically to the first flower you drew. Once this one is removed, we will count another bud, but this one will be slightly distinct. While the last buds were open, this one will be completed and indicated to the injunction. Draw this one in several sections using a few curved lines, then attach it to another thin rod. You can forget to dance 3 of the direction so we can resume counting to the image.
Step 3: Release other flushes for the image.
We will presently count some more blooms in this degree of our focus on attracting a Japanese bloom. Preferably, use more vertical stripes to make a negligibly stouter part of the unit run up. Then you can lure additional blooms, which will be extended as the foremost one was. They will also have a few minor extensions, and another branch will rise even higher. This department will end in a more secure bud like the other one you drew.
Step 4: Following, remove another open bloom.
You can never own multiple buds again, so we’ll add one more to your Japanese flower design at this stage! Using the small branch you drew earlier that ended in a blank, draw another open flower connected to a thin stem. This flower will also have a small closed bud attached to complete this part. Once you keep removing these new blooms, we will be ready to draw some final details and facts in the following step direction.
Step 5: count the Last Points of Your Japanese Flower Illustration
You are now prepared to complete the graphic with some final pieces in this fifth step of our focus on removing a Japanese blossom! We will add rare more flowers to what you drew in the earlier step. And these will be connected to trim limbs and will be closed buds like some of the others. For the last contact, you can draw a little petal away from the buds.
This will complete the image, but you can count your issues before cruising further! One thought would be to attract even better petals sailing away from the tree to make it glance like a breeze blowing. You can also remove a group for another thought. What scenery would you pull for the scene of this photo?
Step 6: Satisfy the Japanese Flower Design with Dye
You have called the last stage of Japanese bud illustration; you can devour it with striking colors in this one. Our authority picture used a traditional color assignment for these blooms. This signifies we used an instead pink color for the petals.