Up to our most recent visit, my son had to sit through a number of excursions to JoAnn Fabrics and hadn’t shown much enthusiasm for any of them. As we passed this cloth, he exclaimed, “THOMAS THE TRAIN!” at the top of his lungs.
He carried his cut fabric around the house while telling me he needed to wear it while we were still in the store and then clutched the bolt of fabric the entire time we were there.
As a result, I reasoned that the present moment would be an excellent opportunity to sew him a cape, which would allow him to don his unique fabric anytime he saw fit. I sized this pattern to accommodate his neck circumference and height, but because it’s a fairly straightforward design, it’s easily adaptable to a superhero of a different stature.
For Making cap you need best sewing Machines So, i recommend first read about sewing machines from mrsewguru.com
The component parts required to build the cape
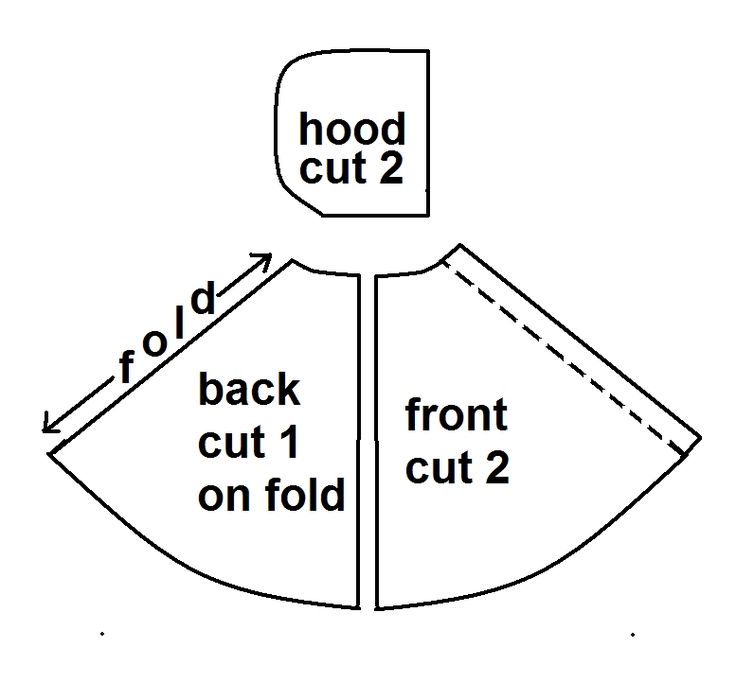
Cape pattern (Download Free printable cape pattern). This pattern is written such that the cape finishes just above the ankle for a 3T size (36 inches tall), therefore adjust the size up or down depending on the height of the child for whom you are making the cape.
You will need to print a total of seven pages, each measuring 8.5 inches by 11 inches. The first four pages are located on the right side of the cape, and the latter three pages are located on the left side of the cape. Simply put the stars in the correct order, and then tape the pages together. Make sure that the page scaling is switched off and that the print setting is set to 100%. This is how it is going to look:
2 pieces of fabric, cut according to the cape pattern, will serve as the front and back of the cape. Each piece of fabric will need to be at least 30 inches wide and 35 inches tall, but you may want to give yourself a few extra inches just in case your cloth isn’t completely square.
The minimum size for each piece of fabric is 30 inches wide by 35 inches tall. I used a cotton fabric with Thomas the Tank Engine on one side and a fabric that looked like it was made for a navy swimsuit on the other side. Because it is flexible, working with it can be a little bit more challenging, but it is wrinkle-resistant and drapes beautifully.
Magnets or Velcro could be used to close the neck opening. I used a set of magnetic sew-in snaps, and they turned out to be an excellent choice. My son is able to take off and put on the cape with ease, and we don’t have to worry about the Velcro wearing out because it washes nicely.
This is a step-by-step guide on how to make a cape for a youngster.
Step 1
Position the two cape fabric pieces so that the correct sides are facing each other. A 1/4-inch seam allowance should be used along the bottom of the cape while you sew around the rest of the cape.
Step 2:
Press the cape while it is turned right side out.
Step 3:
Topstitch the cape all the way around EXCEPT for the seam allowance along the bottom, which should be 1/4 inches.
Step 4:
Position the magnets in the neck and check that the magnetic poles are facing in the same direction. This will ensure that the magnets adhere to one another and will not compete with one another. It is recommended that the magnets be placed inside the cape. The positioning can be seen in the photo that is located above.
Step 5:
To secure the magnet in place, sew a seam across the two neckpieces just below where you placed it. It’s possible that the magnets will try to adhere themselves to your sewing machine. If this is the case, place a piece of cardboard or a thick cloth underneath the magnet (watch out that the magnet doesn’t get caught in the needle by accident!).
Step 6:
Fold the bottom one and a half inches of the cape into the interior of the garment. If you are having difficulties folding the fabric in, consider trimming an inch out of each corner before you fold it. This might help.
Step 7:
You’ll need to sew two seams across the bottom of the cape, one 3/4 inches long and the other a little bit higher than that.