Your job might not be complete if the last time your bathroom sparkled was not enough to mask foul odors or require a concentrated effort in removing brown rust stains from your toilet bowl’s rim. The toilet tank is often overlooked. Don’t be ashamed if you missed it. The lid protects the toilet tank from dirt, bacteria, and mineral buildup until you have to remove it to inspect the parts or stop the toilet from running manually. This can cause metal parts of your toilet tank to corrode, which can lead to bowel staining. Most homeowners are not aware of this problem until it is too late.
Regular cleaning of the toilet tank can prolong the life of the toilet and its components, as well as freshen the bathroom’s odor. It will also save you time and elbow grease when you clean your toilet bowl. Everyone wins! What are you waiting to do? This guide will show you how to clean a toilet tank.
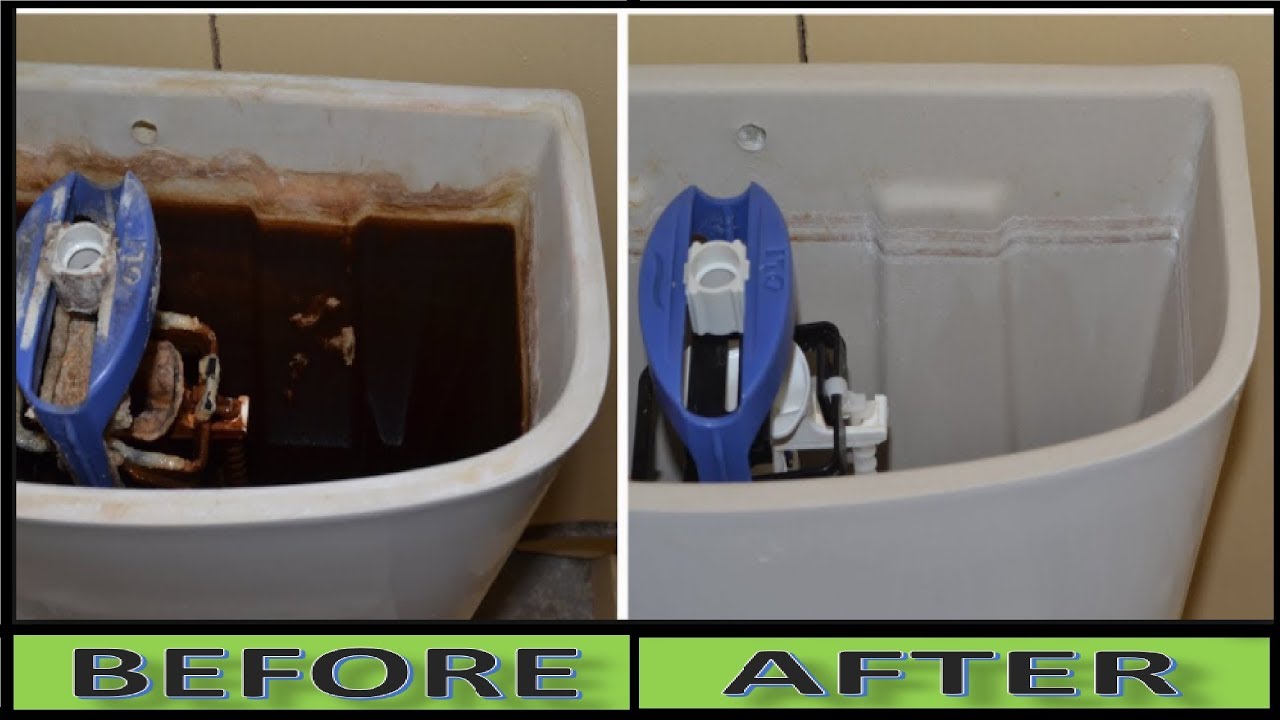
HOW TO CLEAN A TOILET TANK
STEP 1
First, empty the tank. Locate the water valve, which is located on the wall near or behind the base of your toilet. Turn it off. Next, remove the lid from the tank and check the water level. Finally, flush the toilet until it drains completely. This may take two to three flushes depending on how fast your flow rate is. If your toilet flush is slow so you can replace your slow flush toilet with a powerful flushing toilet.
STEP 2
You should assess the tank’s condition. You can clean the tank by scrubbing off any dirt or grime. You can move on to Step 3. If you notice discoloration due to mineral deposits or residue building up at the tank’s bottom and climbing the walls, then use vinegar. This all-natural all-star provides a strong defense against mold, mildew, and hard water deposits. You will need vinegar to fill your tank to the top. It’s actually quite affordable at $3 per gallon. Flush the toilet after 12 hours of letting the vinegar sit. The vinegar should be flushed out when you are ready to clean.
STEP 3
Use rubber gloves to spray the interior of the tank with your preferred disinfectant cleaner. In case of corrosive additives, make sure to keep the spray from metal parts. Bleach is a very corrosive example. The manufacturer recommends a dwell time. In general, the disinfectant should be left to sit for between 10 and 15 minutes.
STEP 4
Get a scrub brush! While some how-tos suggest using the same toilet brushes to clean the tank’s inside, others recommend that you use a new brush due to the amount of cleaning they do every day. This will ensure that you don’t accidentally add contaminants from other dirty jobs to your tank. The scrub brush should have long, narrow, medium-to-firm bristles. It should also be able to reach corners and around fixtures. The additional cleaner can be applied if necessary.
STEP 5
Now that you have removed the lid, think about whether your toilet requires any maintenance. Now that you have removed the lid, consider whether your toilet needs any maintenance.
STEP 6
All parts of the tank that are not working should be cleaned. Instead of spraying the tank and dousing it with a cleaner that could be corrosive, dilute the cleaner first. Use warm water to soak the sponge and then spray the cleaner on the sponge. Use the diluted disinfectant to clean the sponge, ball float, and other parts of the toilet tank. Rinse the sponge and re-soak it as necessary.
STEP 7
Turn off the water and let it fill. Is the tank clean enough? If it is not, drain it once again as in Step 1. Then, repeat Steps 3 through 6.
KEEPING THE TOILET TANK CLEAN
Here are some tips to make life easier in the future.
- You might want to put tank tablets in your toilet. These tablets can help keep contaminants, such as mildew, at bay. Avoid buying tank tablets that have bleach as this can corrode metal. Before you buy any tank tablets, do your research and check out online reviews. Tablets marketed as “natural” and “chemical-free” are best for this job.
- If you don’t use tablets, drain the toilet tank and add vinegar to it (as in Step 2) more often. The vinegar will kill mildew and dissolve mineral deposits before they become a problem. You can leave the vinegar in place overnight, and then flush it out the following morning.
- It is common to suggest a monthly cleaning schedule for the toilet tanks. However, we believe twice a year will be sufficient for small households that have more than one toilet. However, maintenance requirements will depend on the situation. Mineral deposits can build up faster if you have hard water. The toilet will need to be cleaned more often if it is in high-traffic areas, such as a large family home or business. You can lift the tank lid and inspect it every 2 weeks to determine what cleaning cycle your toilet may need. You can keep track of your cleanings and inspections by keeping a calendar.
Also, read- How to choose the most comfortable kitchen island chairs